browse
Important: The best method of configuring QRadar for use with Cisco Umbrella is through the Cisco Cloud Security App. Only proceed with this method if the app cannot be configured.
Overview
QRadar from IBM is a popular SIEM for log analysis. It provides a powerful interface for analyzing large chunks of data, such as the logs provided by Cisco Umbrella for your organization's DNS traffic.
This article will outline the how to get QRadar set up and running so that it is able to pull the logs from your S3 bucket and consume them. There are two main stages, one is to configure your AWS S3 Security Credentials to allow QRadar access to the logs, and the second is to configure QRadar itself to point at your bucket.
If you are using the Cisco-managed S3 bucket, please follow these instructions on How to download logs from Cisco Umbrella Log Management using the AWS CLI.
Prerequisites
Note: This integration has been tested with both customer managed S3 buckets and Cisco managed S3 buckets. The information discussed in this article is current as of this writing - October 2019. It may change based on the way QRadar and AWS Services interface. Support for QRadar must come from IBM, as Cisco is unable to directly support third-party hardware or software. For any issues connecting your Umbrella dashboard to your S3 bucket, we can provide support. Much of the information found below can also be found on the IBM website:
This document is a 'living' document; if you have feedback or have found tricks or hints that could help other customers, please reach out to support.
Cisco Umbrella requirements
This document assumes that your Amazon AWS S3 bucket has been configured in Umbrella (Settings > Log Management) and is showing green with recent logs having been uploaded.
For more information on how to configure this feature, read here: https://support.umbrella.com/hc/en-us/articles/231248448-Cisco-Umbrella-Log-Management-in-Amazon-S3
IBM Security QRadar SIEM requirements
Besides administrative rights to the QRadar appliance(s), the Amazon S3 configuration and Unbrella dashboard, these instructions assume that the QRadar administrator is familiar with creating LSX (Log source Extension) files.
Stage 1: Configuring your Security Credentials in AWS
Note: These steps are the same as those outlined in the article describing how to configure a tool to download the logs from your bucket (https://support.umbrella.com/hc/en-us/articles/231248468-How-to-Downloading-logs-from-Cisco-Umbrella-Log-Management-in-AWS-S3).
If you have already performed those steps, you can skip to stage 2, although you will need the security credentials from your IAM user to authenticate QRadar to your bucket.
Step 1
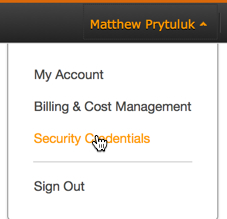
- Add an access key to your Amazon Web Services account to allow for remote access to your local tool and give the ability to upload, download and modify files in S3. Log in to AWS and click your account name in the upper-right hand corner. In the drop-down, select Security Credentials.
- You will be prompted to follow Amazon Best Practices and create an AWS Identity and Access Management (IAM) user. In essence, an IAM user ensures that the account that s3cmd uses to access your bucket is not the master account (for example, your account) for your entire S3 configuration. By creating individual IAM users for people accessing your account, you can give each IAM user a unique set of security credentials. You can also grant different permissions to each IAM user. If necessary, you can change or revoke an IAM user’s permissions at any time.
For more information on IAM users and AWS best practice, read here: http://docs.aws.amazon.com/IAM/latest/UserGuide/IAMBestPractices.html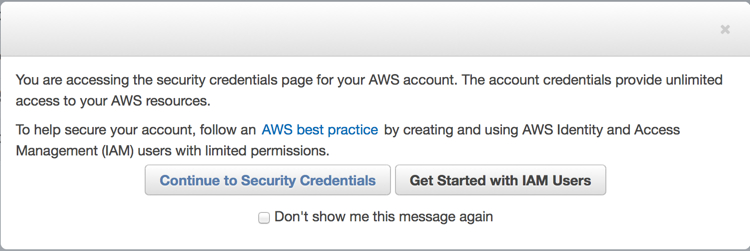
Step 2
- Create an IAM user to access your S3 bucket by clicking Get Started with IAM Users. You're taken to a screen where you can create an IAM User:

- Click Create New Users, then go ahead and fill out the fields. Note that the user account cannot contain spaces.

- After creating the user account, you'll be given only one opportunity to grab two critical pieces of information containing your Amazon User Security Credentials. We highly suggest you download these using the button in the lower right to back them up. They are not available after this stage in the setup. Ensure you make a note of both your Access Key ID and Secret Access Key as we will need them in a later step.

Step 3
- Next, you'll want to add a policy for your IAM user so they have access to your S3 bucket. Click the user you've just created and then scroll down through the users' properties until you see the Attach Policy button.

- Click Attach Policy, then enter 's3' in the policy type filter. This should show two results "AmazonS3FullAccess" and "AmazonS3ReadOnlyAccess".

- Select "AmazonS3FullAccess" and then click "Attach Policy" in the lower right-hand corner.

Now that that's been configured, we can set up QRadar.
Stage 2: Setting up QRadar to pull DNS log data from your S3 bucket
QRadar makes use of the AWS CloudTrail service, which is a web service that records AWS API calls for your account and delivers log files to you.
Prior to QRadar accessing Amazon S3, follow the below procedure from IBM to get the Amazon server certificate. This part is a little tricky, so please ensure you've followed the instructions exactly.
Note: in testing, you MUST use the Firefox browser in order to get this to work as expected!
To get the Amazon server certificate, the user must move the certificate in DER format to the proper QRadar appliance. The QRadar appliance that requires the certificate will be the appliance assigned in the Target Event Collector field in the Amazon AWS CloudTrail log source.
Before you begin
- The certificate must be in .DER format.
- The extension .DER is case sensitive and must be uppercase.
- If the certificate is exported in lowercase, then the log source might experience event collection issues.
Initial Steps:
- Access your AWS CloudTrail S3 bucket: https://<bucketname>.s3.amazonaws.com
- Use Firefox to export the SSL certificate from AWS as a (.DER) certificate. Firefox can create the required certificate with the .DER extension. Click the Site Identity icon (little "lock" icon in the address bar). Then, click More Information, then click View Certificate and click the Details tab. Click Export to Export in .DER format. To re-iterate: the .DER extension is case sensitive and must be uppercase.
- Copy the .DER certificate to the /opt/QRadar/conf/trusted_certificates directory of the QRadar appliance that manages the Amazon AWS CloudTrail log source. You can use WinSCP to copy it. Note: The QRadar appliance that manages the log source is identified by the Target Event Collect field in the Amazon AWS CloudTrail log source. QRadar appliance that manages the Amazon AWS CloudTrail log source should have a copy of the .DER certificate in /opt/QRadar/conf/trusted_certificates
- Log in to the QRadar user interface as an Administrative user.
- Click the Admin tab.
- Click the Log Sources icon.
- Select the Amazon AWS CloudTrail log source.
- From the navigation menu, click Enable/Disable to disable, then re-enable the Amazon AWS CloudTrail log source.
Note: When an administrator forces the log source from disabled to enabled, this allows the protocol to connect to the Amazon AWS bucket as defined in the log source. A certificate check will take place as part of the first communication. - If you continue to have issues, verify that the Log Source Identifier field contains the correct Amazon AWS bucket name and that the Remote Directory path is correct in the log source configuration.
Finalize QRadar Configuration:
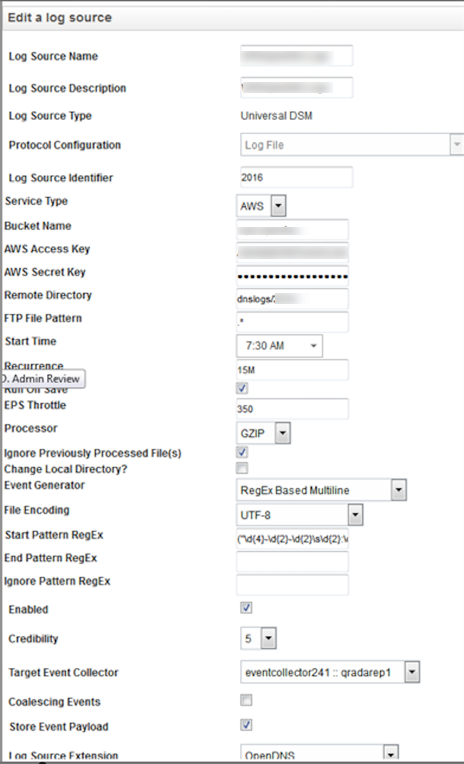
- In QRadar you’re going to want to ensure all of your protocols, DSMs etc. are up to date. Select the LogFileProtocol with the following configurations (your frequency, Start Time, Recurrence, etc may be different).
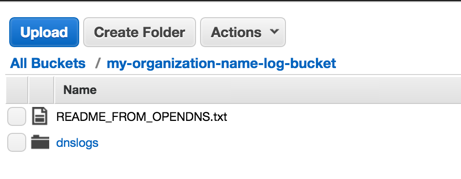
- In the Log Sources tab, enter a Log Source Name and a Log Source Description—these can be whatever you'd like. Then enter your S3 Bucket Name, your AWS Access Key, your AWS Secret Key, and the Remote Directory (likely dnslogs but depends on your setup). Adding a Log Source Identifier like the year can help filter so only logs with "2016" in them are pulled. You'll find screenshots of a sample config below these steps.
- Create an LSX (Log Source eXtension) that will parse the Cisco Umbrella events. You'll find an example LSX below. (Note: This is what it looks like after the import into QRadar.) More information about how exactly to create LSX can be found here: ftp://ftp.software.ibm.com/software/security/products/qradar/documents/71MR1/LogMgr/LogSources-71MR1.pdf. This is just an example, the data you want to pull from the logs may vary depending on the use case. The exact XML below is attached as a file to the bottom of this article.

-
Double-check that your AWS Access Key and AWS Secret Key are copied successfully and pasted into the Log Source Configuration.
- Select the GZIP Processor and an Event Generator of RegEx Based Multiline. The easiest way to get one event per line is by using a start pattern RegEx of:
("\d{4}-\d{2}-\d{2}\s\d{2}:\d{2}:\d{2}",")
Make sure you select your Log Source Extension and Use Condition then save the log source. Lastly, perform a Full Deploy in QRadar.
Your log source should use RestAPI to connect to your bucket with the credentials and keys you provided and begin pulling events.
Sample Config:
An example of this configuration is here. In this example, we'd have the traditional subfolder of '/dnslogs/', with the bucket name 'my-organization-name-log-bucket':
Additional notes
Enable bucket Logging
To enable bucket logging, go here and following the procedures outlined by Amazon. By default, logging is disabled. Once enable, a new folder called /logs resides in your bucket root showing you the information of GETS, PUTS, and DELETES.
Managing the log cycle
When you're using S3, you can manage the lifecycle of the data within the bucket to extend the duration of time you'd like to retain logs for. Depending on the purpose of what you're using the external log management for, the duration could be very short or very long. For instance, you may wish to simply download the logs from the S3 bucket after 24 hours and store them offline, or retain the logs indefinitely in the cloud.
By default, Amazon stores the data in a bucket indefinitely but unlimited storage does raise the cost of maintaining the bucket. For more information on S3 lifecycles, please read: https://docs.aws.amazon.com/AmazonS3/latest/UG/LifecycleConfiguration.html
To configure the lifecycle of your bucket:
- Select the Properties then click Lifecycle.
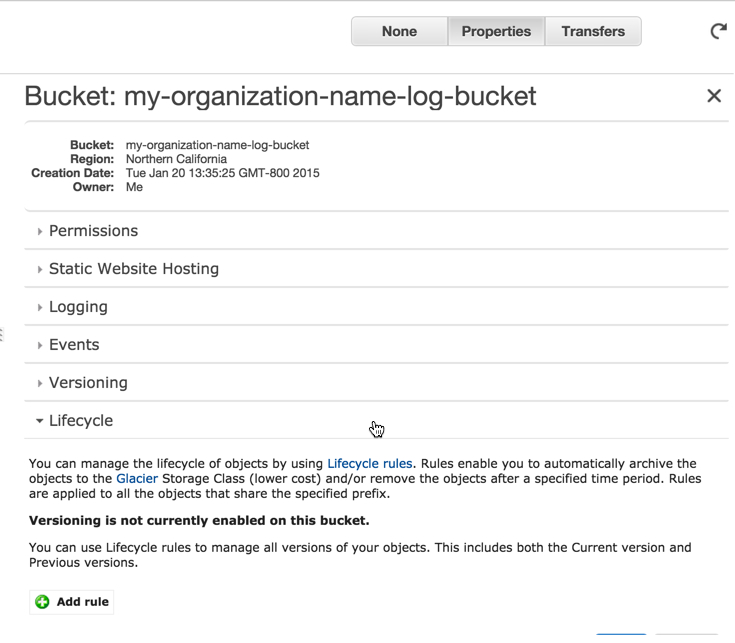
- Click Add a Rule, then Apply the Rule to the whole bucket (or a subfolder if you've configured it as such). Select an Action on Objects, such as Delete or Archive, then select the time period and whether you'd like to use Glacier storage to help reduce your Amazon costs. (Glacier is 'cold' off-line storage, which while slower to access, is much less expensive.)
If you'd prefer to manage logs in another method—for example on your internal backup solution—you can simply download the logs from S3 and preserve them in another way.
